

 Greek
Greek  English
  Spanish
  Russian
  German
  Arabic
  Italian
  Portuguese
  French
  Polish
  Swedish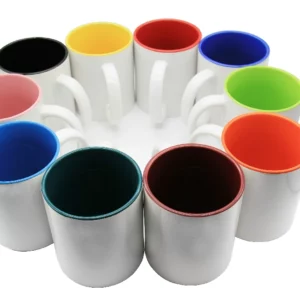
Abstract
The process of creating customized mugs through dye-sublimation represents a sophisticated interplay of material science, digital artistry, and thermal engineering. This document provides a comprehensive examination of the methodologies involved in mug creation, from the foundational selection of materials to the final stages of quality assurance and production scaling. It delineates the critical role of a specialized polymer coating on ceramic, glass, or metal substrates, which serves as the receptive medium for gaseous dyes during thermal transfer. The procedure involves printing a design with sublimation-specific inks onto transfer paper, which is then affixed to the mug. Subsequent application of precise heat and pressure via a mug press or convection oven activates the sublimation process, wherein the dyes transition from a solid to a gaseous state, permeating the polymer coating. The result is a permanent, high-resolution image embedded within the mug’s surface. This exploration offers a detailed, step-by-step guide intended for both amateur enthusiasts and professional manufacturers, elucidating the technical parameters and common challenges to ensure a high-quality, durable, and commercially viable final product.
Key Takeaways
- Select only mugs with a poly-coating for sublimation; standard mugs will not work.
- Use high-resolution images (300 DPI) and design in a CMYK color profile for best results.
- Mirror your image before printing to ensure correct orientation on the final mug.
- Mastering how to create a mug requires precise control of time, temperature, and pressure.
- Allow mugs to cool completely at room temperature to prevent thermal shock and cracking.
- Perform rigorous quality checks for imperfections like ghosting or color bleeding.
- For consistent results, use quality sublimation paper, inks, and equipment.
Table of Contents
- An Introduction to the Art and Science of Mug Creation
- Step 1: Foundational Choices – Selecting Your Canvas and Palette
- Step 2: The Artistic Blueprint – Designing for a Curved Canvas
- Step 3: The Transfer Medium – The Critical Role of Sublimation Inks and Paper
- Step 4: The Printing Process – Translating Digital Vision to Physical Print
- Step 5: The Fusion – Applying the Design with Heat and Pressure
- Step 6: The Aftermath – Cooling, Quality Control, and Finishing Touches
- Step 7: Beyond the Single Mug – Scaling Production and Business Considerations
- Frequently Asked Questions
- Conclusion
- References
An Introduction to the Art and Science of Mug Creation
The humble mug, a ubiquitous object in kitchens and offices worldwide, often serves as more than a mere vessel for beverages. It can be a canvas for personal expression, a corporate branding tool, or a cherished memento. The ability to transform a plain mug into a personalized work of art is made possible through a fascinating process known as dye-sublimation. This guide explores the intricate details of how to create a mug using this method, moving beyond a simple set of instructions to offer a deeper understanding of the principles at play. Our journey will be one of discovery, examining the materials, tools, and techniques from the perspective of a craftsperson who values precision and quality.
At its core, sublimation is a phase transition in which a substance moves directly from a solid to a gas state, bypassing the liquid phase. In the context of mug printing, specialized solid dyes are printed onto a sheet of transfer paper. When this paper is held against a specially coated mug and subjected to high heat and pressure, the dyes vaporize. Simultaneously, the heat causes the polymer coating on the mug to expand, opening its “pores.” The gaseous dye then permeates these open pores. As the mug cools, the pores close, permanently trapping the dye within the surface. The result is not a layer of ink sitting on top of the mug, but a full-color image that is infused into the coating itself, making it incredibly durable, dishwasher-safe, and resistant to scratching.
Understanding this fundamental process is the first step toward mastery. It explains why not just any mug will suffice and why specific inks, papers, and equipment are necessary. Each component plays a crucial role in a chemical and physical ballet that culminates in a vibrant, permanent image. This guide will walk you through each step of the choreography, from selecting the right mug to troubleshooting common issues, empowering you to create professional-quality products consistently. We will explore the nuanced relationship between time, temperature, and pressure, and how these variables must be carefully balanced to achieve optimal results.
Step 1: Foundational Choices – Selecting Your Canvas and Palette
The journey of how to create a mug begins not with a design or a printer, but with the mug itself. The quality and suitability of your substrate—the blank mug—are paramount to the success of the entire endeavor. A flawed canvas will inevitably lead to a flawed masterpiece, regardless of the artist’s skill. This initial selection process requires a thoughtful consideration of material, coating, and form.
The Indispensable Polymer Coating
The single most critical factor in selecting a mug for sublimation is the presence of a specialized polymer coating. A standard ceramic mug from a department store will not work. The sublimation process relies on the dye bonding with polyester molecules. Without this polyester coating, the gaseous dye has nothing to adhere to and will simply wipe away once the mug cools. This is a non-negotiable requirement.
As detailed by industry resources, the coating is the “magic” that enables the transfer (). It is a very thin, clear layer of polymer applied to the mug during its manufacturing. When heated, this polymer softens and expands, becoming receptive to the sublimated dye. Upon cooling, it hardens again, encapsulating the dye particles. The quality of this coating directly impacts the final image’s vibrancy, clarity, and longevity. A poorly applied or low-quality coating can result in a blotchy, faded, or uneven transfer. Therefore, sourcing mugs from a reputable supplier who specializes in sublimation blanks is a foundational step. As a manufacturer with a dedicated thermal sublimation coating processing workshop, we understand the nuances of applying a consistent, high-performance coating that meets international quality standards.
Material Matters: Ceramic, Glass, and Metal
While ceramic is the most common material for sublimation mugs, it is not the only option. The choice of material affects the mug’s aesthetic, its feel, and its performance characteristics.
| Material | Advantages | Disadvantages | Best For |
|---|---|---|---|
| Ceramic | Excellent heat retention, classic feel, cost-effective, wide variety of shapes and sizes. | Can chip or break if dropped, opacity limits certain design effects. | Everyday use, promotional items, personalized gifts, coffee shops. |
| Glass | Elegant and modern appearance, allows for transparent or frosted design effects. | Less durable than ceramic, poor heat retention, requires careful handling. | Special occasions, decorative pieces, high-end gift market, cold beverages. |
| Metal (Stainless Steel/Aluminum) | Extremely durable and shatterproof, lightweight, excellent for travel and outdoor use. | Can get hot to the touch, may impart a slight metallic taste, often more expensive. | Travel mugs, camping gear, durable promotional products for active brands. |
Ceramic Mugs: These are the workhorses of the sublimation world. Their opaque, white surface provides a brilliant canvas for full-color images, making colors pop. Within ceramics, you might find variations like stoneware or porcelain, with porcelain generally being seen as a higher-quality, more refined option. The classic 11oz C-handle mug is an industry standard, but the market offers a vast array of options, including latte mugs, espresso cups, and mugs with colored interiors or handles. These colored elements can be used to complement your design and create a more cohesive product.
Glass Mugs: Sublimating on glass creates a unique, sophisticated effect. The designs can appear translucent, which can be leveraged for artistic purposes. Frosted glass mugs are particularly popular, as they provide a semi-opaque surface that helps the design stand out while still retaining the elegance of glass. The process for glass is similar to ceramic, though temperature and time settings may need slight adjustments.
Metal Mugs: Stainless steel travel mugs and aluminum water bottles are popular for their durability. When sublimating on metal, the base color is typically silver or white. A white base coat is applied before the sublimation coating to ensure color accuracy, just as a painter primes a canvas. Without it, the metallic sheen of the base material would alter the colors of the design.
Evaluating Mug Quality
When selecting your blank mugs, especially when purchasing in bulk, there are several quality indicators to inspect.
- Surface Uniformity: Run your fingers over the mug’s surface. It should be perfectly smooth, with no bumps, pits, or divots. These imperfections can cause gaps in the image transfer.
- Coating Consistency: Look at the mug under a bright light, tilting it to see the reflection. The coating should be even and glossy, without any dull spots, streaks, or “fisheyes.” An inconsistent coating is a primary cause of blotchy prints.
- Structural Integrity: Check for cracks, chips, or malformed handles. A structurally sound mug is essential for both the heating process and for the end user’s safety.
- Shape and Size Consistency: If you are producing a large order, consistency is key. Measure a few mugs from the batch to ensure they conform to the specified dimensions. Variations in diameter can affect how well the mug fits in the press, leading to pressure issues.
Choosing the right mug is an exercise in foresight. It is about understanding how the physical properties of the object will interact with the chemical and thermal processes to come. A wise choice at this stage sets the foundation for a successful and repeatable method for how to create a mug.
Step 2: The Artistic Blueprint – Designing for a Curved Canvas
With the ideal mug selected, the focus shifts to the creative heart of the process: the design. Creating artwork for a three-dimensional, curved object presents unique challenges and opportunities compared to designing for a flat surface. A successful mug design is not merely an image slapped onto a template; it is a thoughtful composition that considers form, color, and the user’s experience.
The Principles of Mug Design
Before opening any software, consider how a person interacts with a mug. It is held, turned, and viewed from multiple angles. This interaction should inform your design choices.
- Placement: Where will the design be located? A full wrap covers the entire surface from handle to handle. A two-sided design places an image on the “front” and “back” (for a right-handed or left-handed user). A single-sided design is simpler but less engaging. Think about who will be using the mug. For a corporate logo, you might want it facing away from the drinker so others can see it. For a personal photo or message, it might be better facing the drinker.
- Flow and Continuity: For full-wrap designs, how the image meets at the back, near the handle, is a critical detail. Seamless patterns or landscapes work beautifully. Abrupt edges or mismatched images can look unprofessional. Some designs cleverly leave a blank space around the handle area where the press may not reach perfectly.
- Hierarchy and Focus: What is the most important part of your design? Use size, color, and placement to draw the eye. A common layout places the primary visual element in the center of one side, with secondary text or graphics supporting it.
Technical Specifications: The Numbers that Matter
The transition from a digital concept to a physical object requires adherence to specific technical parameters. Ignoring these can lead to disappointing results like pixelation, blurriness, or incorrect colors.
- Resolution (DPI): This is perhaps the most crucial technical setting. DPI stands for “Dots Per Inch” and measures the density of pixels in an image. For high-quality printing, the standard is 300 DPI. An image might look sharp on a 72 DPI computer screen, but when printed, it will appear blurry and pixelated if the resolution is too low. Always start your design file at 300 DPI. It is not possible to effectively increase the resolution of a low-quality image; you must start with a high-quality source.
- Color Mode (CMYK vs. RGB): Computer screens, cameras, and scanners create colors using the RGB (Red, Green, Blue) model, an additive process where light is combined to create a spectrum. Printers, however, use the CMYK (Cyan, Magenta, Yellow, Key/Black) model, a subtractive process where inks are layered on paper to absorb light. Sublimation inks are CMYK inks (Gillespie, 2021). While you can design in RGB, it is best practice to convert your final design to CMYK to get a more accurate preview of the printed colors. Some colors that look vibrant in RGB (like neon greens or bright blues) are “out of gamut” for CMYK and will appear duller in print. Converting to CMYK in your design software allows you to adjust these colors before you waste ink and paper.
- Dimensions and Templates: You must design to the correct dimensions. You cannot just guess the size of the printable area. Your mug supplier should provide a template or precise measurements for the height and circumference of the printable area. For an 11oz mug, this is typically around 8.5 inches wide by 3.75 inches tall, but this can vary. Use these dimensions to set up your document. The template will often show a “safe area” where your most critical design elements should be placed to avoid being too close to the top, bottom, or handle edges.
Software and Tools
A variety of software can be used for creating mug designs, each with its own strengths.
- Professional Graphic Design Software: Adobe Photoshop and Adobe Illustrator are the industry standards. Photoshop is a raster-based editor, ideal for working with photographs and complex, pixel-based artwork. Illustrator is a vector-based editor, perfect for logos, text, and illustrations that need to be scaled without any loss of quality. Both offer precise control over color, layers, and layout.
- Free and Open-Source Alternatives: For those on a budget, GIMP (GNU Image Manipulation Program) is a powerful free alternative to Photoshop. Inkscape is an excellent vector-based alternative to Illustrator. While their interfaces may be different, they offer the core functionalities needed for professional mug design, including support for 300 DPI and CMYK color modes.
- Online Design Tools: Platforms like Canva or Placeit offer user-friendly interfaces with pre-made templates and elements. While convenient for beginners, they may offer less control over technical settings like color profiles, so they should be used with caution for professional work.
A final, crucial step in the design phase is to mirror the image before printing. The sublimation process involves pressing the printed paper face-down onto the mug. This acts like a stamp, reversing the image during the transfer. Therefore, you must flip your design horizontally in the software. Forgetting this simple step will result in backward text and reversed logos, a common and frustrating mistake for newcomers.
Step 3: The Transfer Medium – The Critical Role of Sublimation Inks and Paper
The design, no matter how brilliant, is merely a digital file until it is given physical form. This transition is mediated by two specialized components: sublimation ink and sublimation paper. Their properties are finely tuned to work in concert with the heat press to achieve the desired chemical reaction. Understanding the science behind these materials elevates the craft from simple execution to an informed practice.
The Nature of Sublimation Ink
Sublimation ink is fundamentally different from the standard inkjet ink used for document printing. Regular ink is a liquid pigment or dye designed to be absorbed into the porous surface of paper. Sublimation ink, conversely, contains solid dye particles suspended in a liquid carrier (Holman, 2012). It is these solid particles that hold the key to the process.
When heated to temperatures typically between 380-400°F (193-204°C), these dye particles undergo sublimation: they convert directly into a gas. This dye gas is then absorbed by the heat-receptive polymer coating on the mug. It is not a topical application; it is an infusion. This is why the final image is so durable.
The quality of the ink is paramount. High-quality sublimation inks, such as those from recognized brands like Sawgrass, Epson (in their dedicated sublimation printers), or other reputable manufacturers, offer several advantages:
- Color Vibrancy and Accuracy: Superior inks have a higher concentration of finely ground dye particles, which results in richer, more saturated colors in the final product. They are also formulated to produce predictable colors when used with the correct color profiles.
- Nozzle Clogging Prevention: The liquid carrier is designed to flow smoothly through the tiny nozzles of an inkjet printer head without drying or clogging, a common issue with cheaper, poorly formulated inks.
- Μακροζωία: Well-made inks create a stable bond with the polymer coating, ensuring the final image is resistant to fading from UV light and washing.
It is crucial to use a printer dedicated solely to sublimation. You cannot simply put sublimation ink into a printer that has previously used standard ink. The residual standard ink would contaminate the system and ruin the sublimation prints.
The Function of Sublimation Paper
Sublimation paper is not just any paper. It is an engineered product designed for a specific task: to hold the printed sublimation ink on its surface and then release it completely as a gas when heated. Standard copy paper is designed to absorb ink, which is the exact opposite of what is needed for sublimation. If you were to use copy paper, much of the ink would remain trapped in the paper fibers, resulting in a faded, blurry transfer.
A high-quality sublimation paper has several key characteristics:
- Special Coating: The paper has a fine coating on one side (the printing side). This coating prevents the liquid ink from soaking into the paper’s core. The ink dries on top of this coating. The paper feels slightly slick or waxy on the coated side.
- High Release Rate: The primary job of the paper is to let go of the dye. Good sublimation paper boasts a high ink-release rate (often advertised as 95% or higher), meaning the vast majority of the dye transfers from the paper to the mug, ensuring a vibrant and sharp image.
- Fast Drying Time: The coating is also designed to help the ink dry quickly, preventing smudging as it comes out of the printer.
- Appropriate Weight: Sublimation paper comes in various weights (measured in gsm, or grams per square meter). Heavier papers can hold more ink without buckling or becoming overly saturated, which is beneficial for designs with very dark or rich colors.
As highlighted by industry suppliers, using the right paper and ink is essential for achieving high-quality results. It is a system where each component must be optimized. Using premium ink with cheap paper, or vice versa, will compromise the final product. For anyone serious about the process of how to create a mug, investing in quality consumables is not an expense but a prerequisite for success. This synergy between ink and paper is what ensures your carefully crafted digital design is accurately and vibrantly conveyed to the final mug.
Step 4: The Printing Process – Translating Digital Vision to Physical Print
This stage acts as the bridge between the digital realm of your design software and the physical world of the workshop. Proper execution here is critical; a perfect design can be undone by incorrect printer settings or careless handling. This is a step that demands precision and a clean workflow.
Setting Up the Printer
Before you click “Print,” you must configure your printer settings to work with your specific sublimation paper and inks. These settings are not the default ones used for printing a letter or a photograph on plain paper. The goal is to lay down the right amount of ink in the highest quality possible.
- Paper Type: In your printer’s driver settings (the dialog box that appears when you print), you must select the correct paper type. The best setting is often a “premium matte” or “high-quality photo paper” setting. You should not select “plain paper.” The matte paper setting tells the printer to expect a coated surface and to lay down more ink than it would for plain paper, which is necessary for rich sublimation transfers. Check the recommendations from your paper manufacturer for the optimal setting.
- Print Quality: Always select the highest possible print quality. This may be labeled as “High,” “Best,” or “Photo.” This slows down the printing speed but ensures the printer uses its maximum resolution, resulting in a sharper, more detailed image on the transfer paper. A “Standard” or “Draft” mode will be faster but the output will lack the necessary ink density and detail.
- Color Management: This is an advanced but vital setting. Printers use software called an ICC profile (International Color Consortium profile) to translate the CMYK values from your design file into the specific mixture of inks its own cartridges use. For accurate and consistent color, you should install and use the ICC profile provided by your sublimation ink manufacturer. This profile is calibrated for their specific ink formula and your printer model. Within the print dialog, you would typically turn off the printer’s own color management and let the application (e.g., Photoshop) manage colors using the specific ICC profile. This step is what prevents your reds from looking orange or your blues from looking purple.
The Printing Act
Once the settings are correct, you are ready to print.
- Load the Paper Correctly: Sublimation paper only has one printable side. It is usually the brighter white, smoother side. The back may have a watermark or be a duller color. Loading the paper upside down is a common error that results in a completely failed print, as the non-coated back will absorb all the ink.
- Confirm the Mirror Setting: Double-check that your design is mirrored (horizontally flipped). While some printer drivers have a “mirror” checkbox, it is generally more reliable to have mirrored the image in your design software (Photoshop, Illustrator) beforehand. This gives you visual confirmation that it is correct before you send it to the printer.
- Handle with Care: Once the print emerges from the printer, the ink will be dry to the touch but the transfer is still delicate. Handle it by the edges to avoid getting fingerprints on the printed area. Oils from your skin can interfere with the transfer process, leaving smudges or blank spots on the final mug. Let the print sit for a few minutes to ensure the ink is fully set before proceeding to the next step.
The printed transfer will look dull and faded. This is normal and expected. The true, vibrant colors will only emerge under the heat and pressure of the press. This often causes beginners to worry that they have done something wrong, but it is a signature characteristic of the sublimation process. The muted print is a sign that the dye is in its solid, stable state, ready for the thermal transformation that will bring your design to life.
Step 5: The Fusion – Applying the Design with Heat and Pressure
This is the climactic moment in the process of how to create a mug. All the preceding steps—choosing the mug, creating the design, printing the transfer—converge here. In this stage, a combination of precise temperature, calibrated time, and firm pressure will transform the muted print and blank mug into a single, vibrant, and permanent object. The primary tool for this transformation is the mug heat press.
Preparing the Mug and Transfer
Before the mug enters the press, it needs to be prepped.
- Trim the Transfer: Using scissors or a paper trimmer, cut the printed design out from the larger sheet of sublimation paper. Leave a small, even border (perhaps a quarter-inch) around the design. Trimming away excess paper makes it easier to handle and align.
- Clean the Mug: Even a new mug straight from the box can have dust or microscopic debris on its surface. Use a lint-free cloth to wipe the entire surface of the mug. Any speck of dust trapped between the transfer and the mug can block the dye gas, leaving a tiny unprinted white dot on the final product—a frustrating imperfection.
- Position and Secure the Transfer: Carefully wrap the printed transfer around the mug, with the printed side facing the mug’s surface. Precision is key. Use a ruler or your eye to ensure the design is level and centered. Once you are satisfied with the positioning, secure the paper tightly using heat-resistant tape. This is not regular office tape, which would melt and leave a sticky residue. Heat-resistant tape is specifically designed to withstand the high temperatures of the press without melting or leaving marks. Tape the transfer securely along the seam and at the top and bottom edges to prevent it from shifting or lifting during the pressing process. Any movement will cause a blurry or “ghosted” image.
Calibrating the Mug Press
A mug press is a specialized machine with a curved heating element that wraps around the mug. Before you place the mug inside, the press must be set to the correct parameters. These three variables—temperature, time, and pressure—form a delicate balance. The ideal settings can vary slightly based on your specific press, mugs, ink, and paper. It is always recommended to consult the instructions from your mug and equipment suppliers and to perform a test with a spare mug.
| Parameter | Typical Range | Role in Sublimation | Common Problems from Incorrect Settings |
|---|---|---|---|
| Temperature | 380-400°F (193-204°C) | Activates the sublimation process by turning the solid dye into a gas and opening the pores of the polymer coating. | Too Low: Faded, blotchy, or incomplete transfer. Too High: Colors may darken or “burn,” turning browns and blacks yellowish. The coating can be damaged. |
| Time | 180-240 seconds (3-4 minutes) | Determines how long the mug is exposed to the ideal temperature, allowing sufficient time for the dye gas to transfer and bond. | Too Short: Colors will be light and underdeveloped. Too Long: Image may bleed, blur, or “blow out” at the edges. Colors can shift and darken. |
| Pressure | Medium to Firm | Ensures the transfer paper is in full, intimate contact with the entire surface of the mug, eliminating any air gaps. | Too Light: Uneven or faded patches where contact was poor. Too Firm: Can cause mottling or damage the mug’s handle or structure. May cause paper to stick. |
Setting the Press:
- Temperature: Set your target temperature and allow the press to preheat fully. Most presses have a digital display that will indicate when it has reached the set temperature.
- Time: Set the timer for the recommended duration.
- Pressure: Adjust the pressure before the press is hot, using a blank mug as a guide. The mug should fit snugly, requiring a firm but not excessive force to close the clamp. It should feel secure without you needing to strain to close it.
The Pressing Process
With the press preheated and the mug prepped, it is time for the fusion.
- Carefully place the taped mug into the heating element of the press. Ensure it is centered within the element.
- Firmly close the clamp. This will start the timer on most modern presses.
- Wait for the timer to count down and beep. Do not be tempted to open it early to check. The process needs the full, uninterrupted time to complete.
- When the timer beeps, open the press carefully. The mug will be extremely hot. Wear heat-resistant gloves to remove it from the press.
- Place the hot mug on a heat-resistant surface, like a ceramic tile or a heat pad.
- Immediately and carefully peel away the heat-resistant tape and the transfer paper. Peeling the paper while the mug is still hot helps ensure a crisp release and prevents any residual dye gas from re-adhering to the surface and causing a faint “ghost” image.
At this moment, you will see the result of your work. The dull, faded colors on the paper will have transformed into a bright, glossy, and vibrant image, permanently infused into the surface of the mug.
Step 6: The Aftermath – Cooling, Quality Control, and Finishing Touches
The moment the mug emerges from the heat press is exciting, but the process of how to create a mug is not quite complete. The steps taken immediately after pressing are crucial for ensuring the mug’s structural integrity and visual perfection. This phase is defined by careful handling, a critical eye for quality, and an understanding of potential flaws.
The Critical Cooling Period
A ceramic or glass mug removed from a 400°F press is under significant thermal stress. How it cools can be the difference between a perfect product and a cracked one.
- Avoid Thermal Shock: The most important rule is to never quench the hot mug in water or place it on a cold surface like a granite countertop. The rapid, uneven contraction of the material will cause it to crack or even shatter. This phenomenon is known as thermal shock.
- Room Temperature Cooling: The mug must be allowed to cool down naturally at room temperature. Place it on a heat-proof surface in an area with still air. Avoid placing it in front of a fan or an air conditioning vent, as the forced cool air can also cause uneven cooling and stress fractures.
- Patience is Key: A ceramic mug can retain heat for a surprisingly long time. It may take 15-20 minutes or longer for it to be cool enough to handle safely without gloves. Rushing this stage serves no purpose and only introduces risk.
The Quality Control Inspection
Once the mug is completely cool, it is time to perform a thorough quality control (QC) inspection. This is where you assess the success of the transfer and identify any imperfections. For a hobbyist, this ensures personal satisfaction. For a business, this is a non-negotiable step to maintain brand reputation and customer satisfaction. As a company with a complete quality control process, we understand that inspecting every piece is vital.
Examine the mug under good lighting, looking for these common issues:
- Fading or Light Spots: This usually indicates insufficient pressure, time, or temperature. The transfer may look washed out overall, or there may be specific patches that are lighter than others, often due to uneven pressure in the press or an inconsistent coating on the mug.
- Ghosting or Blurring: A faint, secondary image next to the primary design (ghosting) or a general lack of sharpness (blurring) is typically caused by the transfer paper shifting during the press or upon removal. This underscores the importance of taping the transfer securely and peeling it away cleanly and immediately after pressing.
- Banding: Faint horizontal or vertical lines running through the image are often caused by clogged printer nozzles. Performing a nozzle check on your printer before starting a print run can prevent this.
- Color Inaccuracy: If the colors on the mug do not match your design (e.g., reds are orange, grays have a green tint), the issue is most likely related to color management. This points to a problem with using the wrong ICC profile or having incorrect color settings in your software or printer driver.
- Brown or Yellow “Scorching”: If the image, particularly in dark areas, appears brownish or the white areas of the mug look yellowed, the temperature was too high or the time was too long. This is essentially the dye and the polymer coating being “overcooked.”
- Pinpoint White Dots: As mentioned earlier, tiny white dots are usually caused by dust or lint on the mug’s surface before pressing. This highlights the need for a meticulous cleaning step.
Learning to diagnose these issues is part of the craft. Keeping a logbook of your time, temperature, and pressure settings for different types of mugs, along with a photo of the result, can be an invaluable tool for troubleshooting and achieving consistency.
Finishing and Packaging
Once a mug passes the QC inspection, it is ready for its final steps. Give it one last wipe with a soft cloth to remove any fingerprints. If you are selling the mugs, your packaging is the final touchpoint of the customer experience. A sturdy, well-designed box not only protects the mug during shipping but also enhances its perceived value. Consider custom-branded boxes, inserts to hold the mug securely, or including a small care instruction card. This professional presentation completes the process and reinforces the quality of the product you have learned how to create.
Step 7: Beyond the Single Mug – Scaling Production and Business Considerations
Mastering the technique of how to create a single, perfect mug is a significant achievement. Transitioning from a hobbyist pursuit to a small business or a larger-scale production operation, however, introduces a new set of challenges and considerations. This final step is about efficiency, consistency, and commerce. It requires a shift in mindset from crafting an individual piece to developing a robust and repeatable workflow.
Optimizing Your Workflow for Efficiency
When producing mugs in quantity, time is money. Every second saved in the workflow, when multiplied across hundreds or thousands of units, adds up to significant gains in productivity.
- Batch Processing: Do not work on one mug from start to finish. Instead, break the process down into batches. Print all your transfers at once. Trim and tape all your transfers to the mugs in a single session. This “assembly line” approach minimizes the time spent switching between tasks and tools.
- Investing in Advanced Equipment: While a single mug press is great for starting out, it quickly becomes a bottleneck. To scale up, consider investing in a press with multiple stations or several individual presses. This allows you to be pressing one mug while you are prepping the next one, creating a continuous flow. For very high volumes, a convection oven combined with silicone mug wraps or shrink-wrap sleeves can be used to sublimate many mugs simultaneously. The wraps provide the necessary pressure to hold the transfer paper against the mug.
- Workspace Organization: A well-organized workspace is an efficient workspace. Have dedicated areas for your printer, your trimming and taping station, your heat press(es), and a safe cooling rack. Keep your blank mugs and shipping supplies easily accessible. A logical layout reduces movement and streamlines the entire process.
Sourcing and Supply Chain Management
When you are only making a few mugs, buying a small pack of blanks from a craft retailer is fine. When you need hundreds or thousands, you need a reliable, cost-effective supply chain.
- Buying in Bulk: The per-unit cost of blank mugs, ink, and paper drops significantly when purchased in bulk. This is critical for achieving a profitable price point for your final product.
- Finding a Reliable Supplier: Your relationship with your supplier is crucial. You need a partner who can provide consistent quality, stable pricing, and reliable stock levels. An inconsistent supply of your primary mug style can halt your production. This is where working directly with an experienced manufacturer can be a significant advantage. An integrated factory and trade company like TopSub, with its own ceramic and coating workshops, has direct control over the production process, ensuring a high level of quality control and product consistency from batch to batch.
- OEM and ODM Services: As your business grows, you may want to create unique mug shapes or offer proprietary products. Look for suppliers that offer OEM (Original Equipment Manufacturer) and ODM (Original Design Manufacturer) services. OEM allows you to put your brand on existing products, while ODM enables you to collaborate on creating completely new designs, giving you a unique edge in the market.
The Business of Selling Mugs
Creating a great product is only half the battle; you also need to sell it.
- Pricing Strategy: Calculate your costs accurately. This includes not just the blank mug, ink, and paper, but also a portion of your equipment cost, your labor, packaging, and shipping. Research the market to see what similar products are selling for, and price your mugs competitively while ensuring a healthy profit margin.
- Photography and Marketing: Your product photos are your most important marketing tool, especially if you are selling online. Take high-quality, well-lit photos of your mugs from multiple angles. Show them in use to help customers visualize them in their own lives. Market your products through social media, an e-commerce website, or online marketplaces like Etsy or Amazon. Highlight what makes your mugs unique—your designs, your quality, or your story.
- Shipping and Fulfillment: Mugs are fragile. Invest in proper shipping boxes and packing materials (like bubble wrap or foam inserts) to ensure your products arrive safely. Damaged items lead to refunds, replacements, and unhappy customers. Streamline your shipping process to get orders out quickly and efficiently.
Scaling the process of how to create a mug is a journey from artist to artisan-entrepreneur. It demands the same attention to detail as creating a single piece but applies it to a broader system of production, logistics, and commerce. By building a solid foundation of efficient workflows, reliable sourcing, and smart business practices, you can turn your passion for creating beautiful mugs into a thriving enterprise.
Frequently Asked Questions
Why do my sublimation mugs look faded after pressing?
Faded or washed-out images on a sublimation mug are most often caused by one of three factors or a combination thereof: insufficient temperature, insufficient time, or insufficient pressure. The sublimation process requires a specific thermal window to fully convert the dyes to a gas and infuse them into the polymer coating. If the temperature is too low or the time is too short, the reaction will be incomplete. Similarly, if the pressure is too light, there may be air gaps between the transfer paper and the mug, preventing a proper transfer. Always check the recommendations from your equipment and consumables supplier and consider a slight increase in time or pressure for your next attempt.
Can I use a regular convection oven to make a sublimation mug?
Yes, you can use a convection oven instead of a dedicated mug press. However, you cannot simply place the mug and paper in the oven. The process requires firm, even pressure to ensure the transfer paper is in intimate contact with the mug’s surface. To achieve this, you must use a silicone mug wrap or a shrink-wrap sleeve. The mug with the taped-on transfer is placed inside the wrap or sleeve, which is then clamped or shrunk tightly around it. The entire assembly is then baked in the convection oven at the recommended temperature and time. This method is particularly useful for sublimating multiple mugs at once or for unusually shaped items that do not fit a standard press.
Why does my text or logo appear backward on the finished mug?
This is a very common mistake for beginners and the solution is simple: you must mirror your image before printing. The sublimation process transfers the image from the paper to the mug like a stamp, which reverses the orientation. Any design containing text, logos, or any asymmetrical element must be horizontally flipped in your design software (e.g., Photoshop, Illustrator) before you send it to the printer. Most design software has a simple “Flip Horizontal” command. Making this a final checklist item before printing will prevent this error.
Is it safe to put a sublimation mug in the dishwasher and microwave?
Generally, yes. A high-quality sublimation mug, created with proper technique, is both dishwasher and microwave safe. The image is not sitting on the surface but is infused into the polymer coating, making it very durable. The image will not peel or flake off. However, for maximum longevity and to preserve the ultimate vibrancy of the colors over many years, hand-washing is often recommended. Extreme heat cycles in some high-powered dishwashers could potentially cause very gradual fading over a long period.
What is the difference between a coated and an uncoated ceramic mug?
The difference is everything when it comes to sublimation. An uncoated ceramic mug is a standard mug you would buy for everyday use. Its glaze is not designed to accept sublimation dye. A coated ceramic mug has been industrially treated with a special layer of polymer (polyester). This coating is the receptive layer that absorbs the gaseous dye during the heat press process. Without this specific coating, the sublimation transfer will fail completely, and the ink will simply wipe off. It is imperative to purchase mugs specifically sold as “sublimation blanks.”
Conclusion
The journey of how to create a mug through dye-sublimation is a compelling blend of technical precision and artistic expression. It moves beyond simple craft to engage principles of chemistry, physics, and design. From the foundational choice of a polymer-coated substrate to the critical calibration of heat, time, and pressure, each step is a link in a chain that determines the quality of the final product. We have explored the necessity of specialized inks and papers, the importance of high-resolution and color-managed design, and the meticulous process of heat transfer itself.
Success in this field, whether for personal projects or commercial enterprise, hinges on a deep understanding of these interconnected elements. It requires patience to master the variables, a critical eye for quality control, and a commitment to using the right materials for the job. The reward for this diligence is the ability to transform a simple, blank vessel into a vibrant, durable, and personalized object. The resulting mug is not merely printed upon; it is infused with color and creativity, a testament to a process that is as much a science as it is an art. By embracing the principles outlined in this guide, creators can consistently produce professional-grade mugs that are both beautiful and lasting.
References
Gillespie, C. (2021). The chemistry behind dyeing. American Chemical Society. Retrieved from
Holman, J. S. (2012). Experimental methods for engineers (8th ed.). McGraw-Hill.
Mecolour. (2023, May 6). 10 common problems and 17 tips in mug sublimation printing. MeColour. https://www.mecolour.com/10-common-problems-and-17-tips-in-mug-sublimation-printing/
Print on Demand Cast. (2023, February 27). Sublimation printing on ceramic mugs: The basics.
Sharma, A. (Ed.). (2018). Handbook of textile and industrial dyeing: Principles, processes and types of dyes (Vol. 1). Woodhead Publishing. https://doi.org/10.1016/C2014-0-03328-9
TopSub. (2025, July 23). What are the differences between coated and uncoated ceramic mugs?. https://www.topsub.cn/what-are-the-differences-between-coated-and-uncoated-ceramic-mugs/
Zibo Tuopus International Trade Co., Ltd. (n.d.). About Us. TopSub. Retrieved 2025, from https://www.topsub.cn/about-us/
Zibo Tuopus International Trade Co., Ltd. (n.d.). Ceramic Sublimation Mugs. TopSub. Retrieved 2025, from https://www.topsub.cn/category/ceramic-sublimation-mugs/